Dinner, simplified.
When the day has already taken enough energy, sheet pan dinners under 400 calories can make dinner feel manageable again. You chop, season, spread everything on one tray, and let the oven do most of the work.
This roundup is built for real weeknights: colorful vegetables, lean proteins, simple sauces, and portions that land around the 400 kcal mark. The calorie values are estimates, but each recipe is designed to give you a clear starting point without turning dinner into a math project.
Quick answer
These 7 sheet pan dinners under 400 calories are easy one-pan meals for busy evenings. Each recipe serves 4 and includes estimated calories per serving, metric and imperial ingredient amounts, beginner-friendly steps, storage notes, and simple serving ideas.
Why you’ll love this
- One tray means less washing up after dinner.
- Every recipe uses normal supermarket ingredients.
- The meals feel colorful and satisfying without heavy sauces.
Roundup at a glance
| Recipe | Main protein | Prep time | Cook time | Estimated kcal per serving |
|---|---|---|---|---|
| Chicken Pineapple Fajita Sheet Pan Dinner | Chicken breast | 15 min | 22 min | 339 kcal |
| Lemon Herb Salmon with Green Beans and Potatoes | Salmon | 12 min | 24 min | 387 kcal |
| Crispy Tofu and Vegetables with Sesame Soy Glaze | Tofu | 18 min | 28 min | 359 kcal |
| Turkey Meatballs with Zucchini and Tomatoes | Lean turkey | 20 min | 25 min | 331 kcal |
| Shrimp Taco Sweet Potato Sheet Pan Bowls | Shrimp | 15 min | 25 min | 383 kcal |
| Chicken Sausage, Cabbage and Apple Sheet Pan Dinner | Chicken sausage | 12 min | 30 min | 355 kcal |
| Greek Chicken with Potatoes, Zucchini and Feta | Chicken breast | 15 min | 30 min | 399 kcal |
Easy 400 Calorie Sheet Pan Dinners for Busy Weeknights
The best sheet pan meals are not complicated. They usually follow one simple formula: protein, vegetables, a little oil, a strong seasoning blend, and a small smart carbohydrate if the meal needs more staying power.
For best results, avoid crowding the tray. If the ingredients are stacked too tightly, they steam instead of roasting. Use your largest rimmed baking sheet, or divide the food between two pans if needed.
Recipe 1: Chicken Pineapple Fajita Sheet Pan Dinner
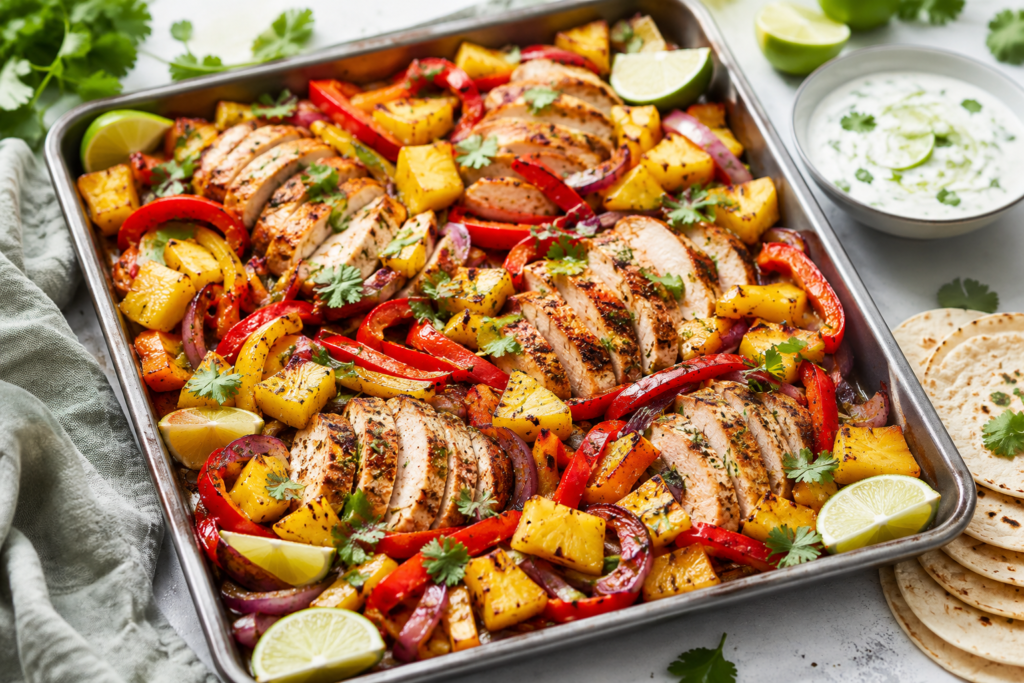
This sweet-savory fajita tray bake is bright, fast, and very weeknight-friendly. Pineapple adds freshness, peppers bring color, and the yogurt-lime topping keeps the final plate creamy without making it heavy.
Recipe at a glance
- Prep time: 15 minutes
- Cook time: 22 minutes
- Total time: 37 minutes
- Servings: 4
- Estimated kcal per serving: 339 kcal
Ingredients
| Ingredient | Metric quantity | Imperial quantity | Estimated kcal for listed amount | Notes / swaps |
| Boneless skinless chicken breast, sliced | 500 g | 1.1 lb | 600 kcal | Slice into thin strips for fast cooking |
| Fresh pineapple chunks | 240 g | 1 1/2 cups | 120 kcal | Use canned pineapple in juice, drained, if needed |
| Bell peppers, sliced | 450 g | 3 medium peppers | 140 kcal | Use mixed colors for a brighter tray |
| Red onion, sliced | 150 g | 1 medium onion | 60 kcal | Yellow onion also works |
| Olive oil | 15 ml | 1 tbsp | 120 kcal | Use just enough to coat |
| Lime juice | 30 ml | 2 tbsp | 8 kcal | Lemon juice works in a pinch |
| Fajita seasoning | 12 g | 1 tbsp + 1 tsp | 25 kcal | Choose a lower-sugar blend if possible |
| Small corn tortillas | 100 g | 4 small tortillas | 220 kcal | One tortilla per serving |
| Plain Greek yogurt, 2% | 120 g | 1/2 cup | 70 kcal | Use 0% yogurt for a slightly lighter option |
| Fresh cilantro | 5 g | 1/4 cup loosely packed | 1 kcal | Optional |
| Salt and black pepper | To taste | To taste | 0 kcal | Adjust after cooking |
Total estimated kcal for the whole recipe: 1,364 kcal
Estimated kcal per serving: 341 kcal
Equipment needed
- Large rimmed baking sheet
- Baking parchment
- Mixing bowl
- Tongs
- Small bowl for yogurt sauce
How to make it
- Preheat the oven to 220°C / 425°F. Line a large rimmed baking sheet with baking parchment.
- Slice the chicken, peppers, and onion into even strips so they cook at the same speed.
- Add the chicken, peppers, onion, and pineapple to a large bowl.
- Drizzle with olive oil and lime juice. Sprinkle with fajita seasoning, salt, and black pepper.
- Toss for 30–45 seconds until the chicken and vegetables are lightly coated.
- Spread everything in a single layer on the baking sheet. Keep the chicken pieces separated so they roast instead of steam.
- Roast for 12 minutes, then remove the tray and stir with tongs.
- Return the tray to the oven and roast for another 8–10 minutes, until the chicken is opaque, lightly browned at the edges, and reaches 74°C / 165°F in the thickest piece.
- Warm the tortillas for 1–2 minutes in the oven or in a dry pan.
- Stir the Greek yogurt with a squeeze of extra lime if you like a thinner sauce.
- Divide the fajita mixture between 4 plates. Serve each portion with 1 tortilla, yogurt sauce, and cilantro.
Tips for best results
- Cut the chicken into thin strips, not large chunks.
- Drain pineapple well if using canned pineapple.
- Use the largest tray you have to prevent steaming.
- Add a pinch of chili flakes if you want more heat.
- Warm the tortillas just before serving so they stay flexible.
Easy swaps and variations
- Use chicken thigh fillets if you prefer a juicier texture, but calories will be slightly higher.
- Swap pineapple for mango chunks for a softer, sweeter flavor.
- Serve over shredded lettuce instead of tortillas for a lighter plate.
- Add sliced jalapeño if your family enjoys heat.
Storage and meal-prep notes
Store the cooked fajita filling in an airtight container in the fridge for up to 3 days. Reheat in a skillet over medium heat for 4–5 minutes, or microwave in short bursts until hot. Freeze the cooked filling without yogurt or tortillas for up to 2 months.
What to serve with it
Serve with a simple tomato-cucumber salad, shredded lettuce, or a spoonful of salsa. Keep sides light if you want the full meal to stay close to the 400 kcal range.
Nutrition estimate
- Total kcal: approximately 1,364 kcal
- Kcal per serving: approximately 341 kcal
- Rough protein / carbs / fat per serving: 34 g protein, 35 g carbs, 8 g fat
Nutrition values are estimates and can vary depending on ingredient brands, tortilla size, and exact portions.
Recipe 2: Lemon Herb Salmon with Green Beans and Potatoes
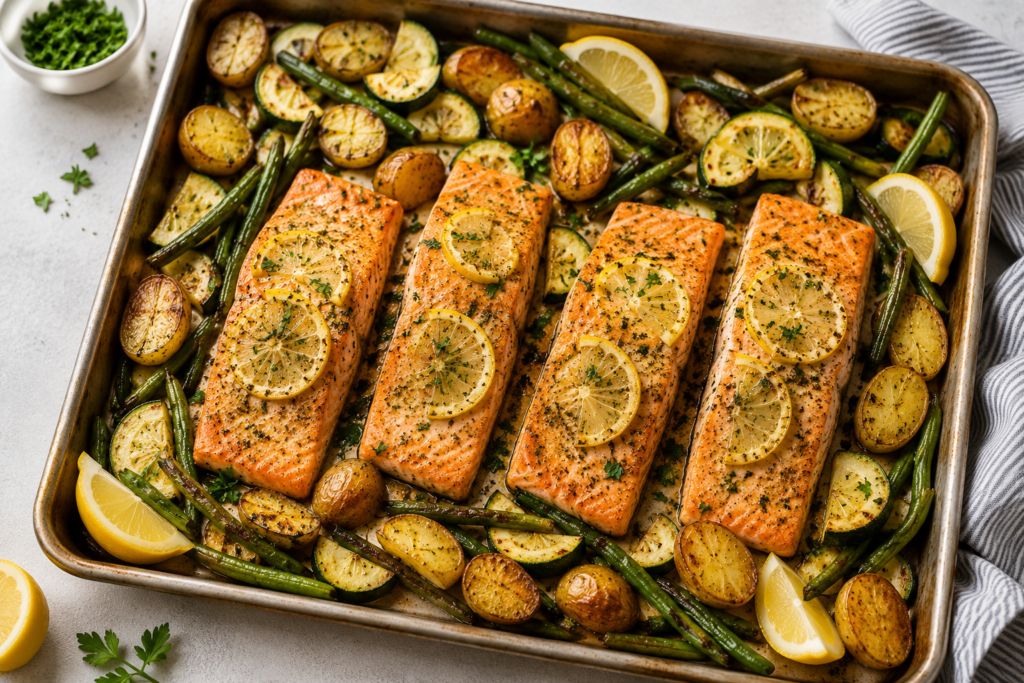
This salmon sheet pan dinner feels fresh and complete without needing a heavy sauce. The potatoes roast first, then the salmon and green vegetables finish on the same tray.
Recipe at a glance
- Prep time: 12 minutes
- Cook time: 24 minutes
- Total time: 36 minutes
- Servings: 4
- Estimated kcal per serving: 387 kcal
Ingredients
| Ingredient | Metric quantity | Imperial quantity | Estimated kcal for listed amount | Notes / swaps |
| Salmon fillets | 480 g | 4 fillets, 4.2 oz each | 960 kcal | Skin-on or skinless both work |
| Baby potatoes, halved | 400 g | 14 oz | 308 kcal | Cut larger potatoes into small chunks |
| Green beans, trimmed | 400 g | 14 oz | 124 kcal | Asparagus also works |
| Zucchini, sliced | 300 g | 2 small zucchini | 51 kcal | Slice into thick half-moons |
| Olive oil | 10 ml | 2 tsp | 80 kcal | Divide between potatoes and vegetables |
| Lemon juice | 30 ml | 2 tbsp | 8 kcal | Add zest for stronger flavor |
| Dijon mustard | 15 g | 1 tbsp | 10 kcal | Whole grain mustard also works |
| Garlic, minced | 6 g | 2 cloves | 9 kcal | Use garlic powder if needed |
| Dried oregano | 2 g | 1 tsp | 6 kcal | Dill or parsley also works |
| Salt and black pepper | To taste | To taste | 0 kcal | Season in layers |
Total estimated kcal for the whole recipe: 1,556 kcal
Estimated kcal per serving: 389 kcal
Equipment needed
- Large rimmed baking sheet
- Baking parchment
- Small bowl
- Brush or spoon
- Food thermometer, recommended
How to make it
- Preheat the oven to 220°C / 425°F. Line a large rimmed baking sheet with baking parchment.
- Place the halved baby potatoes on the tray. Add 1 tsp olive oil, a pinch of salt, and black pepper.
- Spread the potatoes cut-side down and roast for 12 minutes, until the cut sides start to turn golden.
- Mix lemon juice, Dijon mustard, garlic, oregano, the remaining 1 tsp olive oil, salt, and black pepper in a small bowl.
- Remove the tray from the oven. Push the potatoes to one side.
- Add the green beans and zucchini to the empty side of the tray. Spoon a little lemon mixture over the vegetables and toss gently.
- Place the salmon fillets on the tray, leaving a little space between each piece.
- Brush the salmon with the remaining lemon-Dijon mixture.
- Return the tray to the oven and roast for 10–12 minutes, until the salmon flakes easily with a fork and reaches 63°C / 145°F in the thickest part.
- Rest the salmon for 2 minutes before serving so it stays moist.
- Divide the salmon, potatoes, green beans, and zucchini between 4 plates.
Tips for best results
- Start the potatoes before adding the salmon so everything finishes together.
- Keep salmon fillets similar in thickness.
- Do not overcook the salmon; check it early if your fillets are thin.
- Add fresh lemon wedges at the end for a brighter plate.
- Use parchment to prevent the salmon from sticking.
Easy swaps and variations
- Swap green beans for asparagus or tenderstem vegetables.
- Use cod instead of salmon for a lighter fish option, but reduce cooking time slightly.
- Add fresh dill after baking for a more classic salmon flavor.
- Use sweet potato instead of baby potatoes if you prefer a softer, sweeter base.
Storage and meal-prep notes
Store leftovers in the fridge for up to 2 days. Reheat gently in the microwave at 50–70% power or in a covered oven-safe dish at 160°C / 325°F for 8–10 minutes. Freezing is not ideal because the vegetables soften and the salmon can dry out.
What to serve with it
Serve with extra lemon, a small green salad, or cucumber slices. If you need a more filling meal, add a spoonful of plain yogurt with herbs and keep the potato portion steady.
Nutrition estimate
- Total kcal: approximately 1,556 kcal
- Kcal per serving: approximately 389 kcal
- Rough protein / carbs / fat per serving: 31 g protein, 28 g carbs, 18 g fat
Nutrition values are estimates and can vary depending on salmon size, potato type, and exact oil measurement.
Recipe 3: Crispy Tofu and Vegetables with Sesame Soy Glaze

This vegetarian sheet pan dinner is built around tofu cubes, crisp-tender vegetables, and a glossy sesame-soy glaze. A small portion of cooked brown rice makes it feel like a full dinner while keeping the serving around 400 kcal.
Recipe at a glance
- Prep time: 18 minutes
- Cook time: 28 minutes
- Total time: 46 minutes
- Servings: 4
- Estimated kcal per serving: 359 kcal
Ingredients
| Ingredient | Metric quantity | Imperial quantity | Estimated kcal for listed amount | Notes / swaps |
| Firm tofu, drained and pressed | 480 g | 17 oz | 576 kcal | Press for at least 10 minutes |
| Red bell pepper, sliced | 300 g | 2 medium peppers | 93 kcal | Any color pepper works |
| Carrots, thinly sliced | 250 g | 2 large carrots | 103 kcal | Slice thinly so they soften |
| Sugar snap peas | 300 g | 10.5 oz | 126 kcal | Green beans also work |
| Red onion, sliced | 150 g | 1 medium onion | 60 kcal | Optional but adds sweetness |
| Low-sodium soy sauce | 45 ml | 3 tbsp | 25 kcal | Tamari works if needed |
| Maple syrup or honey | 15 g | 2 tsp | 46 kcal | Use less for a less sweet glaze |
| Rice vinegar | 30 ml | 2 tbsp | 6 kcal | Apple cider vinegar works |
| Sesame oil | 5 ml | 1 tsp | 40 kcal | Strong flavor, small amount |
| Cornstarch | 12 g | 1 1/2 tbsp | 46 kcal | Helps tofu edges crisp |
| Garlic, grated | 6 g | 2 cloves | 9 kcal | Use garlic powder if needed |
| Fresh ginger, grated | 8 g | 1 tbsp | 6 kcal | Optional but recommended |
| Sesame seeds | 6 g | 2 tsp | 35 kcal | Add after baking |
| Cooked brown rice | 240 g | 1 1/3 cups | 264 kcal | 60 g / 1/3 cup per serving |
Total estimated kcal for the whole recipe: 1,435 kcal
Estimated kcal per serving: 359 kcal
Equipment needed
- Large rimmed baking sheet
- Baking parchment
- Clean kitchen towel or paper towels
- Mixing bowl
- Small bowl
How to make it
- Preheat the oven to 220°C / 425°F. Line a large rimmed baking sheet with baking parchment.
- Press the tofu for 10 minutes between towels with a plate on top to remove extra moisture.
- Cut the tofu into 2 cm / 3/4 inch cubes.
- Add the tofu to a bowl and sprinkle with cornstarch. Toss gently until the cubes are lightly coated.
- Spread the tofu on one side of the baking sheet.
- Add bell pepper, carrots, snap peas, and red onion to the other side of the tray.
- Mix soy sauce, maple syrup, rice vinegar, sesame oil, garlic, and ginger in a small bowl.
- Spoon about half the glaze over the vegetables. Toss the vegetables directly on the tray.
- Roast for 15 minutes, then remove the tray and flip the tofu cubes with a spatula.
- Spoon the remaining glaze over the tofu and vegetables.
- Return the tray to the oven and roast for another 10–13 minutes, until the tofu edges look lightly crisp and the vegetables are bright and tender.
- Sprinkle with sesame seeds.
- Divide the tofu, vegetables, and cooked brown rice between 4 bowls.
Tips for best results
- Press the tofu well; wet tofu does not crisp properly.
- Cut carrots thinly so they cook at the same speed as the other vegetables.
- Use parchment so the glaze does not burn onto the tray.
- Add sesame seeds after baking so they keep their flavor.
- Keep rice portions measured if you want to stay close to the calorie estimate.
Easy swaps and variations
- Swap brown rice for cauliflower rice if you want a lighter bowl.
- Use edamame instead of snap peas for more protein.
- Add chili flakes or sriracha to the glaze for heat.
- Use tamari instead of soy sauce if that fits your pantry better.
Storage and meal-prep notes
Store in the fridge for up to 3 days. Keep rice separate if possible for the best texture. Reheat in a skillet over medium heat for 5–6 minutes, or microwave until hot. Freezing is not recommended because tofu and vegetables can become watery.
What to serve with it
Serve with cucumber slices, shredded lettuce, or a small spoonful of extra soy sauce and vinegar. Avoid adding large amounts of extra rice if you want to keep the meal near 400 kcal.
Nutrition estimate
- Total kcal: approximately 1,435 kcal
- Kcal per serving: approximately 359 kcal
- Rough protein / carbs / fat per serving: 22 g protein, 44 g carbs, 12 g fat
Nutrition values are estimates and can vary depending on tofu brand, rice moisture, and sauce measurements.
Recipe 4: Turkey Meatballs with Zucchini and Tomatoes
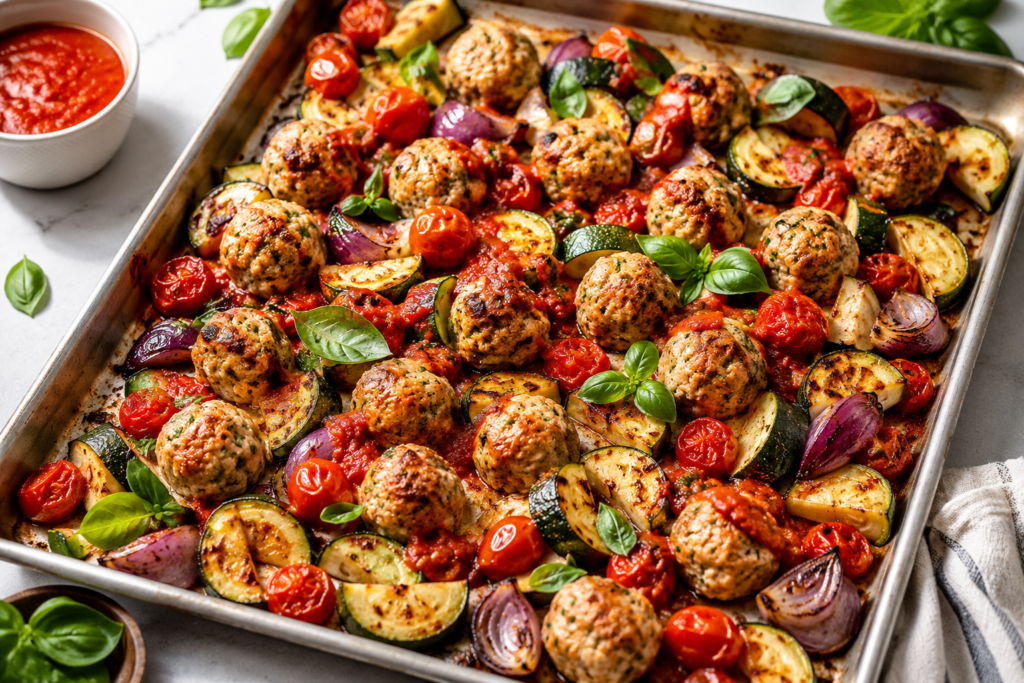
These lean turkey meatballs roast directly on the tray with zucchini, tomatoes, onion, and a little marinara. It is cozy, simple, and lighter than a classic pasta-and-meatballs dinner.
Recipe at a glance
- Prep time: 20 minutes
- Cook time: 25 minutes
- Total time: 45 minutes
- Servings: 4
- Estimated kcal per serving: 331 kcal
Ingredients
| Ingredient | Metric quantity | Imperial quantity | Estimated kcal for listed amount | Notes / swaps |
| Lean ground turkey | 500 g | 1.1 lb | 700 kcal | Use 93–99% lean turkey |
| Egg | 50 g | 1 large egg | 70 kcal | Helps bind the meatballs |
| Plain breadcrumbs | 25 g | 1/4 cup | 94 kcal | Use oats if preferred |
| Parmesan, finely grated | 10 g | 2 tbsp | 43 kcal | Optional but adds flavor |
| Garlic, minced | 6 g | 2 cloves | 9 kcal | For the meatballs |
| Italian seasoning | 3 g | 1 tbsp | 8 kcal | Dried oregano also works |
| Zucchini, thick half-moons | 500 g | 3 medium zucchini | 85 kcal | Do not slice too thin |
| Cherry tomatoes | 400 g | 2 1/2 cups | 72 kcal | Grape tomatoes work too |
| Red onion, wedges | 150 g | 1 medium onion | 60 kcal | Cut into thin wedges |
| Olive oil | 10 ml | 2 tsp | 80 kcal | For the vegetables |
| Marinara sauce | 160 g | 2/3 cup | 120 kcal | Choose a simple tomato sauce |
| Fresh basil | 5 g | 1/4 cup loosely packed | 1 kcal | Optional |
| Salt and black pepper | To taste | To taste | 0 kcal | Season meatballs and vegetables |
Total estimated kcal for the whole recipe: 1,342 kcal
Estimated kcal per serving: 336 kcal
Equipment needed
- Large rimmed baking sheet
- Baking parchment
- Mixing bowl
- Spoon or small scoop
- Food thermometer, recommended
How to make it
- Preheat the oven to 210°C / 410°F. Line a large rimmed baking sheet with baking parchment.
- Add ground turkey, egg, breadcrumbs, Parmesan, garlic, Italian seasoning, salt, and black pepper to a bowl.
- Mix gently with clean hands or a spoon until just combined. Do not overmix or the meatballs can become dense.
- Shape the mixture into 20 small meatballs, about 25 g / 1 oz each.
- Place zucchini, cherry tomatoes, and red onion on the baking sheet.
- Drizzle the vegetables with olive oil. Season with salt and black pepper.
- Toss the vegetables and spread them into an even layer.
- Nestle the meatballs between the vegetables, leaving a little space around each one.
- Bake for 15 minutes, then remove the tray from the oven.
- Spoon marinara sauce over and around the meatballs.
- Return the tray to the oven and bake for another 8–10 minutes, until the meatballs are browned, firm, and reach 74°C / 165°F in the center.
- Rest for 3 minutes, then scatter with basil before serving.
Tips for best results
- Use a small scoop to make evenly sized meatballs.
- Mix the turkey gently to keep the texture tender.
- Keep zucchini pieces thick so they do not collapse.
- Add the marinara near the end so it warms without burning.
- Use a thermometer for the most reliable doneness check.
Easy swaps and variations
- Swap ground turkey for lean ground chicken.
- Add chili flakes to the marinara for a spicy version.
- Serve over spiralized zucchini if you want a bigger-looking plate.
- Add a small side of cooked pasta if you have room in your calorie target.
Storage and meal-prep notes
Store leftovers in the fridge for up to 3 days. Reheat in a covered skillet over medium-low heat for 6–8 minutes, or microwave until hot. Freeze the cooked meatballs and sauce for up to 2 months; freeze vegetables separately only if you do not mind a softer texture.
What to serve with it
Serve with a green salad, steamed green beans, or 40–50 g cooked pasta if you want a more classic plate while still keeping portions controlled.
Nutrition estimate
- Total kcal: approximately 1,342 kcal
- Kcal per serving: approximately 336 kcal
- Rough protein / carbs / fat per serving: 34 g protein, 16 g carbs, 15 g fat
Nutrition values are estimates and can vary depending on turkey leanness, marinara brand, and meatball size.
Recipe 5: Shrimp Taco Sweet Potato Sheet Pan Bowls

This recipe turns taco-night flavors into a lighter sheet pan bowl. Sweet potato adds comfort, shrimp cooks quickly, and the yogurt-lime drizzle keeps everything fresh.
Recipe at a glance
- Prep time: 15 minutes
- Cook time: 25 minutes
- Total time: 40 minutes
- Servings: 4
- Estimated kcal per serving: 383 kcal
Ingredients
| Ingredient | Metric quantity | Imperial quantity | Estimated kcal for listed amount | Notes / swaps |
| Raw peeled shrimp | 600 g | 1.3 lb | 510 kcal | Pat dry before seasoning |
| Sweet potato, small cubes | 600 g | 1.3 lb | 516 kcal | Cut into 1.5 cm / 1/2 inch cubes |
| Bell peppers, sliced | 300 g | 2 medium peppers | 93 kcal | Mixed colors look best |
| Red onion, sliced | 150 g | 1 medium onion | 60 kcal | Optional |
| Corn kernels | 160 g | 1 cup | 138 kcal | Fresh, frozen, or canned and drained |
| Olive oil | 15 ml | 1 tbsp | 120 kcal | Divide between potatoes and shrimp |
| Taco seasoning | 12 g | 1 tbsp + 1 tsp | 25 kcal | Use a low-salt blend if preferred |
| Lime juice | 30 ml | 2 tbsp | 8 kcal | More for serving if desired |
| Plain Greek yogurt, 2% | 100 g | 1/3 cup + 1 tbsp | 59 kcal | Thin with lime juice |
| Fresh cilantro | 5 g | 1/4 cup loosely packed | 1 kcal | Optional |
| Salt and black pepper | To taste | To taste | 0 kcal | Adjust at the end |
Total estimated kcal for the whole recipe: 1,530 kcal
Estimated kcal per serving: 383 kcal
Equipment needed
- Large rimmed baking sheet
- Baking parchment
- Mixing bowl
- Small bowl
- Tongs
How to make it
- Preheat the oven to 220°C / 425°F. Line a large rimmed baking sheet with baking parchment.
- Add sweet potato cubes to the tray. Drizzle with 2 tsp olive oil and sprinkle with half the taco seasoning.
- Spread the sweet potato in a single layer and roast for 15 minutes, until the edges begin to soften and brown.
- Pat the shrimp dry with paper towels while the sweet potato roasts.
- Toss the shrimp with the remaining 1 tsp olive oil, remaining taco seasoning, and 1 tbsp lime juice.
- Remove the tray from the oven. Add bell peppers, red onion, and corn around the sweet potato.
- Stir the vegetables gently, then place the seasoned shrimp on top in a single layer.
- Return the tray to the oven and roast for 7–9 minutes, until the shrimp turn pink, curl into a loose C shape, and are opaque in the center.
- Mix Greek yogurt with the remaining lime juice, a pinch of salt, and enough water to make a drizzle.
- Divide the shrimp, sweet potato, peppers, onion, and corn between 4 bowls.
- Drizzle with yogurt-lime sauce and finish with cilantro.
Tips for best results
- Cut sweet potato small so it cooks before the shrimp is added.
- Dry the shrimp well for better texture.
- Do not overcook shrimp; they become rubbery quickly.
- Add the shrimp only in the final minutes.
- Use parchment to make cleanup easier.
Easy swaps and variations
- Swap shrimp for diced chicken breast, but roast the chicken longer.
- Use butternut squash instead of sweet potato.
- Add shredded lettuce after baking for a bigger taco bowl.
- Use a spoonful of salsa instead of the yogurt drizzle.
Storage and meal-prep notes
Store leftovers in the fridge for up to 2 days. Reheat gently in a skillet for 3–4 minutes or microwave at 50–70% power. Shrimp is best freshly cooked, so for meal prep, roast the sweet potato and vegetables ahead and add shrimp the day you eat.
What to serve with it
Serve with shredded lettuce, chopped tomatoes, lime wedges, or salsa. If you add tortillas, count them separately because they will increase the total calories.
Nutrition estimate
- Total kcal: approximately 1,530 kcal
- Kcal per serving: approximately 383 kcal
- Rough protein / carbs / fat per serving: 35 g protein, 48 g carbs, 7 g fat
Nutrition values are estimates and can vary depending on shrimp size, sweet potato weight, and yogurt brand.
Recipe 6: Chicken Sausage, Cabbage and Apple Sheet Pan Dinner

This cozy sheet pan dinner is savory, slightly sweet, and very low-effort. Chicken sausage makes it fast, cabbage adds volume, and apple brings a gentle sweetness that works beautifully with mustard.
Recipe at a glance
- Prep time: 12 minutes
- Cook time: 30 minutes
- Total time: 42 minutes
- Servings: 4
- Estimated kcal per serving: 355 kcal
Ingredients
| Ingredient | Metric quantity | Imperial quantity | Estimated kcal for listed amount | Notes / swaps |
| Lean chicken sausage, sliced | 360 g | 12.7 oz | 580 kcal | Calories vary widely by brand |
| Green cabbage, sliced | 700 g | 1 small head | 175 kcal | Slice into thick ribbons |
| Apple, sliced | 250 g | 2 medium apples | 130 kcal | Use a firm apple |
| Baby potatoes, quartered | 500 g | 1.1 lb | 385 kcal | Cut small for even roasting |
| Olive oil | 15 ml | 1 tbsp | 120 kcal | Helps cabbage brown |
| Whole grain mustard | 30 g | 2 tbsp | 20 kcal | Dijon also works |
| Apple cider vinegar | 20 ml | 1 tbsp + 1 tsp | 3 kcal | Adds brightness |
| Dried thyme | 2 g | 1 tsp | 5 kcal | Optional |
| Salt and black pepper | To taste | To taste | 0 kcal | Adjust after baking |
Total estimated kcal for the whole recipe: 1,418 kcal
Estimated kcal per serving: 355 kcal
Equipment needed
- Large rimmed baking sheet
- Baking parchment
- Small bowl
- Tongs
- Sharp knife
How to make it
- Preheat the oven to 220°C / 425°F. Line a large rimmed baking sheet with baking parchment.
- Add potatoes to the tray. Drizzle with 2 tsp olive oil, salt, and black pepper.
- Roast the potatoes for 12 minutes, until they begin to soften at the edges.
- Mix mustard, apple cider vinegar, thyme, and the remaining 1 tsp olive oil in a small bowl.
- Remove the tray from the oven. Add sliced cabbage, apple, and chicken sausage.
- Spoon the mustard mixture over the tray.
- Toss everything gently with tongs, then spread into an even layer.
- Return the tray to the oven and roast for 15 minutes.
- Stir the tray, turning the cabbage and sausage slices so the browned edges face up.
- Roast for another 5–8 minutes, until the potatoes are fork-tender, the sausage edges are browned, and the cabbage is soft with golden tips.
- Rest for 2 minutes before dividing into 4 portions.
Tips for best results
- Choose a chicken sausage with clear nutrition information.
- Cut potatoes small so they cook through.
- Do not slice cabbage too thin; it shrinks as it roasts.
- Add the apple after the potatoes have started roasting so it does not become mushy.
- Use mustard generously for flavor without many calories.
Easy swaps and variations
- Swap green cabbage for red cabbage for a deeper color.
- Use pear instead of apple for a softer sweetness.
- Add caraway seeds for a more classic cabbage flavor.
- Use turkey sausage if the calories are similar.
Storage and meal-prep notes
Store in the fridge for up to 3 days. Reheat in a skillet over medium heat for 5–7 minutes for the best texture. You can freeze it for up to 2 months, but the cabbage and apple will be softer after thawing.
What to serve with it
Serve with a simple green salad, pickles, or extra mustard on the side. If you want more volume without many extra calories, add cucumber slices or a vinegar-based slaw.
Nutrition estimate
- Total kcal: approximately 1,418 kcal
- Kcal per serving: approximately 355 kcal
- Rough protein / carbs / fat per serving: 23 g protein, 41 g carbs, 13 g fat
Nutrition values are estimates and can vary significantly depending on the chicken sausage brand and potato size.
Recipe 7: Greek Chicken with Potatoes, Zucchini and Feta
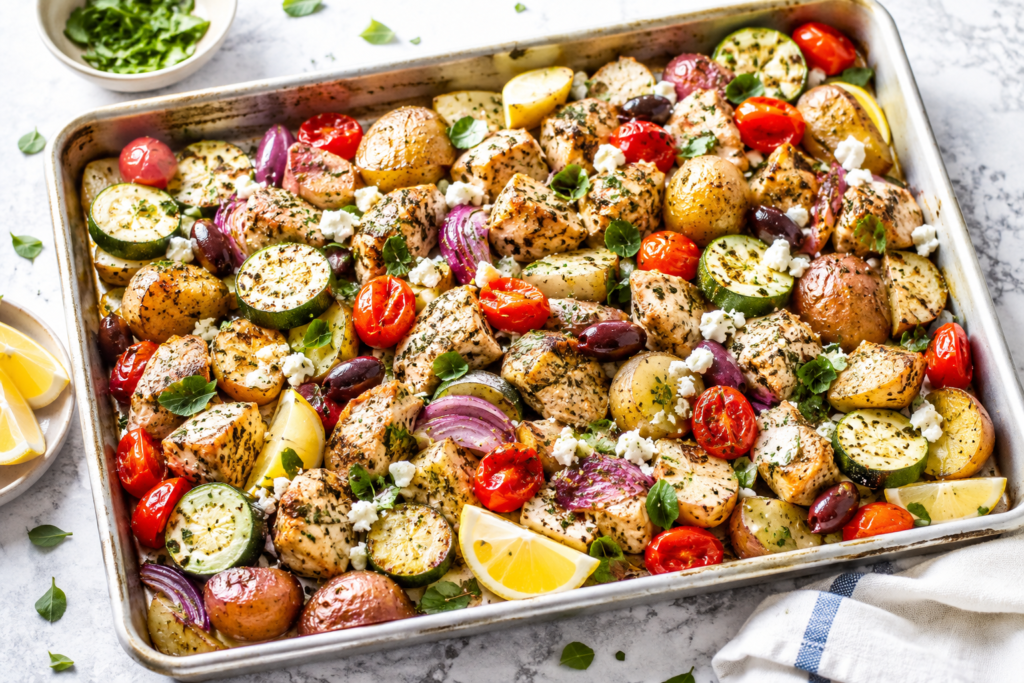
This Greek-inspired chicken sheet pan dinner is bright, satisfying, and full of roasted vegetables. Feta and olives add big flavor in small amounts, which helps the meal stay close to 400 kcal.
Recipe at a glance
- Prep time: 15 minutes
- Cook time: 30 minutes
- Total time: 45 minutes
- Servings: 4
- Estimated kcal per serving: 399 kcal
Ingredients
| Ingredient | Metric quantity | Imperial quantity | Estimated kcal for listed amount | Notes / swaps |
| Boneless skinless chicken breast, chunks | 560 g | 1.25 lb | 672 kcal | Cut into even bite-size pieces |
| Baby potatoes, halved | 500 g | 1.1 lb | 385 kcal | Start roasting before adding zucchini |
| Zucchini, thick half-moons | 400 g | 2–3 medium zucchini | 68 kcal | Keep pieces thick |
| Cherry tomatoes | 300 g | 2 cups | 54 kcal | Add color and moisture |
| Red onion, wedges | 150 g | 1 medium onion | 60 kcal | Cut into thin wedges |
| Olive oil | 15 ml | 1 tbsp | 120 kcal | Enough for the full tray |
| Feta cheese, crumbled | 60 g | 1/2 cup | 160 kcal | A little goes a long way |
| Kalamata olives, sliced | 40 g | 1/4 cup | 58 kcal | Optional but flavorful |
| Lemon juice | 30 ml | 2 tbsp | 8 kcal | Add zest if desired |
| Garlic, minced | 6 g | 2 cloves | 9 kcal | Fresh or powdered |
| Dried oregano | 3 g | 1 tbsp | 8 kcal | Key flavor |
| Salt and black pepper | To taste | To taste | 0 kcal | Use less salt if olives are salty |
Total estimated kcal for the whole recipe: 1,602 kcal
Estimated kcal per serving: 401 kcal
Equipment needed
- Large rimmed baking sheet
- Baking parchment
- Mixing bowl
- Tongs
- Food thermometer, recommended
How to make it
- Preheat the oven to 220°C / 425°F. Line a large rimmed baking sheet with baking parchment.
- Add the halved baby potatoes to the tray with 1 tsp olive oil, salt, and black pepper.
- Spread the potatoes cut-side down and roast for 12 minutes.
- Add chicken pieces to a bowl with lemon juice, garlic, oregano, the remaining 2 tsp olive oil, salt, and black pepper.
- Toss the chicken for 30 seconds until evenly coated.
- Remove the tray from the oven. Add the chicken, zucchini, cherry tomatoes, and red onion.
- Toss everything gently on the tray and spread into a single layer.
- Roast for 15 minutes, then stir the vegetables and flip the chicken pieces.
- Return the tray to the oven for another 5–8 minutes, until the chicken is golden at the edges and reaches 74°C / 165°F in the thickest piece.
- Sprinkle feta and olives over the hot tray.
- Rest for 3 minutes so the feta softens slightly.
- Divide into 4 portions and serve with extra lemon wedges if desired.
Tips for best results
- Start the potatoes first so they become tender.
- Cut chicken pieces evenly for reliable cooking.
- Add feta after roasting so it stays creamy instead of drying out.
- Keep zucchini thick so it does not turn watery.
- Use lemon zest if you want stronger Greek-style flavor.
Easy swaps and variations
- Swap chicken breast for turkey breast pieces.
- Use roasted red peppers instead of tomatoes.
- Skip olives if you prefer a milder flavor.
- Add fresh parsley after baking for a fresher finish.
Storage and meal-prep notes
Store in the fridge for up to 3 days. Reheat in the microwave or in a covered skillet over medium-low heat for 5–6 minutes. Freezing is possible without the feta, but the zucchini will soften after thawing.
What to serve with it
Serve with cucumber salad, extra lemon, or a spoonful of plain Greek yogurt. If you add pita bread, count it separately because it will raise the calorie total.
Nutrition estimate
- Total kcal: approximately 1,602 kcal
- Kcal per serving: approximately 401 kcal
- Rough protein / carbs / fat per serving: 39 g protein, 31 g carbs, 14 g fat
Nutrition values are estimates and can vary depending on chicken size, feta brand, olives, and exact portions.
Final practical takeaway
If you want the fastest option, choose the shrimp taco bowls. If you want the most meal-prep-friendly recipe, make the turkey meatballs. If you want something fresh and satisfying for dinner guests, the salmon or Greek chicken trays feel a little more special without adding complicated steps.
FAQ
Are sheet pan dinners good for meal prep?
Yes. Most sheet pan dinners work well for meal prep because the protein and vegetables cook together and store easily in containers. For the best texture, keep sauces, yogurt toppings, tortillas, or rice separate until serving.
How do I keep sheet pan dinners under 400 calories?
Use lean protein, plenty of vegetables, measured oil, and a controlled portion of potatoes, rice, tortillas, or cheese. The easiest mistake is adding extra oil or oversized carbohydrate portions without counting them.
Can I make these sheet pan dinners without parchment paper?
Yes. You can roast directly on a lightly oiled baking sheet, but parchment makes cleanup easier and helps prevent sticking. Avoid wax paper because it is not designed for oven roasting.
Can I double these recipes?
Yes, but use two baking sheets instead of crowding one tray. Crowding traps steam and can make the vegetables watery instead of roasted.
Are the calorie counts exact?
No. The calorie counts are estimates. They can change depending on ingredient brands, the size of the pieces, how much oil stays on the tray, and how evenly the recipe is divided.
What oven temperature is best for sheet pan dinners?
Most sheet pan dinners roast well at 210–220°C / 410–425°F. This range helps vegetables brown while cooking proteins quickly, but delicate foods like shrimp and fish should be checked early.