These 7 make-ahead lunchboxes under 400 calories are built for busy weekdays, simple meal prep, and realistic portions.
If you need under 400 calorie lunchbox ideas that feel practical instead of punishing, this roundup is for you. These lunches are simple enough for a normal home kitchen, easy to prep ahead, and built around ingredients that are easy to find.
The goal here is not to make tiny lunches. It is to make smart ones. Each lunchbox gives you a realistic portion, clear prep steps, and enough flavor and texture to make weekday lunches feel sorted instead of stressful.
These seven make-ahead lunchboxes are designed for busy women who want easy, balanced lunches around 400 kcal per serving. You will find chicken, turkey, tuna, eggs, chickpeas, and tofu options, with practical storage tips and estimated calories for each recipe. Calorie values are estimates and can vary by brand and exact portion.
Why these make-ahead lunchboxes under 400 calories work
- They are easy to prep in advance without turning your kitchen upside down.
- They stay close to 400 calories per serving without feeling too light.
- They give you a mix of high-protein, vegetarian, fresh, and warm lunch options.
At a glance – Table of Contents
| Recipe | Best for | Total time | Servings | Estimated kcal per serving |
|---|---|---|---|---|
| Lemon Herb Chicken Couscous Lunchbox | A balanced classic lunchbox | 35 minutes | 2 | 384 kcal |
| Turkey Taco Rice Lunchbox | A hearty work lunch | 25 minutes | 2 | 371 kcal |
| Tuna White Bean Crunch Lunchbox | A no-fuss prep day | 15 minutes | 2 | 367 kcal |
| Greek Chickpea Feta Pasta Lunchbox | A vegetarian cold lunch | 20 minutes | 2 | 367 kcal |
| Spinach Egg Muffin Protein Lunchbox | A grab-and-go box | 40 minutes | 2 | 387 kcal |
| Sesame Tofu Edamame Noodle Jar | A fresh plant-based option | 30 minutes | 2 | 385 kcal |
| Pesto Chicken Orzo Tomato Lunchbox | A bright, meal-prep-friendly pasta box | 25 minutes | 2 | 390 kcal |
All calorie values are estimated and will vary slightly depending on brand, exact weight, and final portioning.
Recipe 1: Lemon Herb Chicken Couscous Lunchbox
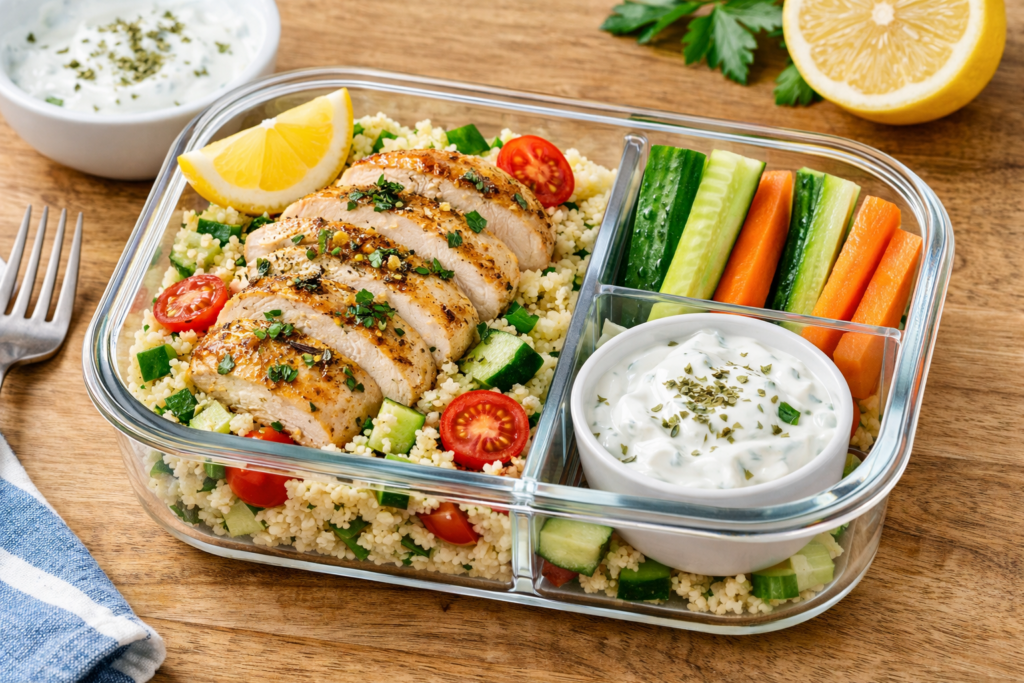
This is the kind of lunchbox that feels light but still holds up well through the afternoon. The roasted vegetables add volume, the couscous keeps it practical, and the lemon helps everything taste fresh even after chilling.
Recipe at a glance
- Prep time: 10 minutes
- Cook time: 25 minutes
- Total time: 35 minutes
- Servings: 2
- Estimated kcal per serving: 384 kcal
Ingredients
| Ingredient | Metric quantity | Imperial quantity | Estimated kcal for listed amount | Notes / swaps |
|---|---|---|---|---|
| Chicken breast, skinless | 250 g | 8.8 oz | 275 | Swap for turkey breast |
| Dry couscous | 70 g | 2.5 oz | 263 | Swap for bulgur |
| Olive oil | 5 mL | 1 tsp | 40 | Use for roasting |
| Zucchini | 150 g | 5.3 oz | 26 | Courgette works the same |
| Red bell pepper | 120 g | 4.2 oz | 37 | Yellow pepper also works |
| Cherry tomatoes | 150 g | 5.3 oz | 27 | Grape tomatoes are fine |
| Lemon juice | 30 mL | 2 tbsp | 8 | Fresh is best here |
| Feta | 30 g | 1.1 oz | 80 | Use reduced-fat feta if preferred |
| Fresh parsley | 10 g | 0.35 oz | 4 | Mint also works |
| Dried oregano | 1 tsp | 1 tsp | 3 | Use Italian seasoning if needed |
| Garlic, minced | 1 clove | 1 clove | 4 | Optional but helpful |
Total estimated kcal for the whole recipe: 767 kcal
Estimated kcal per serving: 384 kcal
Equipment needed
- Baking tray
- Small saucepan or heatproof bowl
- Knife and chopping board
- Mixing bowl
- Two lunch containers
How to make it
- Preheat the oven to 220°C / 425°F. Line a baking tray if you want easier cleanup.
- Slice the zucchini and bell pepper into bite-size pieces. Spread them on one side of the tray with the cherry tomatoes.
- Place the chicken on the other side of the tray. Drizzle with the olive oil, then sprinkle over the oregano and minced garlic. Rub the seasoning over the chicken and vegetables.
- Roast for 18 to 22 minutes. Turn the vegetables once halfway through. The vegetables should look softened with some browned edges, and the chicken should reach 74°C / 165°F in the thickest part.
- Add the couscous to a heatproof bowl. Pour over 80 mL / 1/3 cup boiling water. Cover and rest for 5 minutes, then fluff with a fork.
- Slice the cooked chicken and toss the couscous with half the lemon juice and the parsley.
- Divide the couscous between two lunchboxes. Top with the roasted vegetables, sliced chicken, feta, and the remaining lemon juice.
Tips for best results
- Roast the chicken and vegetables on the same tray, but keep a little space between them so they roast instead of steam.
- Cut the vegetables into similar-size pieces so they soften at the same pace.
- Let the chicken rest for 5 minutes before slicing so it stays juicier.
- Fluff the couscous while it is still warm to stop clumping.
- Add the feta after cooling slightly so it keeps its shape.
Easy swaps and variations
- Use cooked quinoa instead of couscous for a different texture.
- Swap chicken breast for cooked turkey breast or leftover rotisserie chicken.
- Add a few spinach leaves under the couscous for extra volume.
- Use grilled halloumi instead of chicken if you want a vegetarian version, but the calories will rise slightly.
Storage and meal-prep notes
Store in the fridge for up to 3 days. This lunchbox is not ideal for freezing because the roasted vegetables lose texture. It can be eaten cold or reheated gently in the microwave for 1 to 1 1/2 minutes.
What to serve with it
This works well on its own. If you want a little extra, add lemon wedges or a side of crunchy cucumber slices.
Nutrition estimate
- Total kcal: 767 kcal
- Kcal per serving: 384 kcal
- Rough protein: 35 g per serving
- Rough carbs: 27 g per serving
- Rough fat: 12 g per serving
These nutrition values are practical estimates and will vary depending on brand, exact ingredients, and portion size.
Recipe 2: Turkey Taco Rice Lunchbox
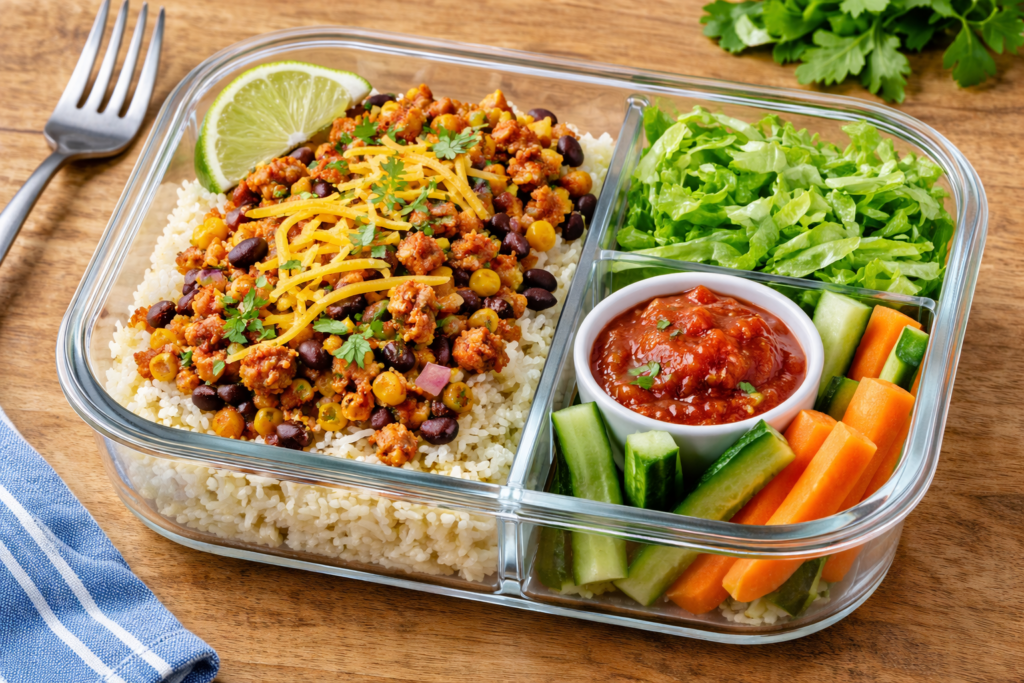
This one is warm, savory, and easy to batch prep without much effort. It brings taco bowl energy into a lunchbox format that still stays under 400 calories per serving.
Recipe at a glance
- Prep time: 10 minutes
- Cook time: 15 minutes
- Total time: 25 minutes
- Servings: 2
- Estimated kcal per serving: 371 kcal
Ingredients
| Ingredient | Metric quantity | Imperial quantity | Estimated kcal for listed amount | Notes / swaps |
|---|---|---|---|---|
| Lean turkey mince, 5% fat | 200 g | 7 oz | 270 | Chicken mince also works |
| Cooked rice | 120 g | 4.2 oz | 156 | Brown or white rice both work |
| Black beans, drained | 80 g | 2.8 oz | 88 | Pinto beans are a good swap |
| Sweetcorn | 60 g | 2.1 oz | 52 | Frozen or canned works |
| Salsa | 60 g | 1/4 cup | 20 | Choose a chunky salsa |
| Red onion, diced | 60 g | 2.1 oz | 24 | White onion is fine |
| Romaine lettuce, shredded | 80 g | 2.8 oz | 14 | Pack separately for max crunch |
| Cheddar, grated | 15 g | 0.5 oz | 61 | Use a strong cheddar for more flavor |
| Olive oil | 5 mL | 1 tsp | 40 | For the pan |
| Lime juice | 15 mL | 1 tbsp | 4 | Fresh or bottled |
| Taco seasoning | 2 tsp | 2 tsp | 12 | Low-salt blend works well |
Total estimated kcal for the whole recipe: 741 kcal
Estimated kcal per serving: 371 kcal
Equipment needed
- Frying pan
- Wooden spoon or spatula
- Knife and chopping board
- Two lunch containers
How to make it
- Heat the olive oil in a frying pan over medium heat for 30 seconds.
- Add the diced red onion and cook for 2 to 3 minutes, stirring often, until it softens and starts to look glossy.
- Add the turkey mince and taco seasoning. Break the meat up with a spoon and cook for 5 to 6 minutes until there is no pink left and the pan looks mostly dry.
- Stir in the black beans, sweetcorn, and salsa. Cook for 2 more minutes until everything is hot and well mixed.
- Divide the cooked rice between two lunchboxes. Spoon the turkey mixture over the rice.
- Top with the cheddar and drizzle with lime juice.
- Add the shredded lettuce to a separate compartment, or pack it in a small bag or box if you want it to stay crisp.
Tips for best results
- Use cooked rice that has cooled fully so the lunchbox stays fresher for longer.
- Let the turkey mixture cool slightly before closing the container to reduce condensation.
- Keep the lettuce separate if you are prepping more than one day ahead.
- A strong salsa adds plenty of flavor without needing extra oil or cheese.
Easy swaps and variations
- Use cooked quinoa instead of rice.
- Add diced tomatoes instead of sweetcorn if you prefer a fresher finish.
- Swap cheddar for a spoonful of light sour cream packed separately.
- Use extra black beans and skip the meat for a vegetarian version.
Storage and meal-prep notes
Store in the fridge for up to 3 days. The turkey and rice portion can be frozen for up to 2 months. Reheat the rice and turkey mixture until piping hot, then add the lettuce after reheating.
What to serve with it
A few cucumber sticks, a lime wedge, or extra salsa all work well without pushing the calories too far.
Nutrition estimate
- Total kcal: 741 kcal
- Kcal per serving: 371 kcal
- Rough protein: 27 g per serving
- Rough carbs: 31 g per serving
- Rough fat: 11 g per serving
These nutrition values are practical estimates and will vary depending on brand, exact ingredients, and portion size.
Recipe 3: Tuna White Bean Crunch Lunchbox
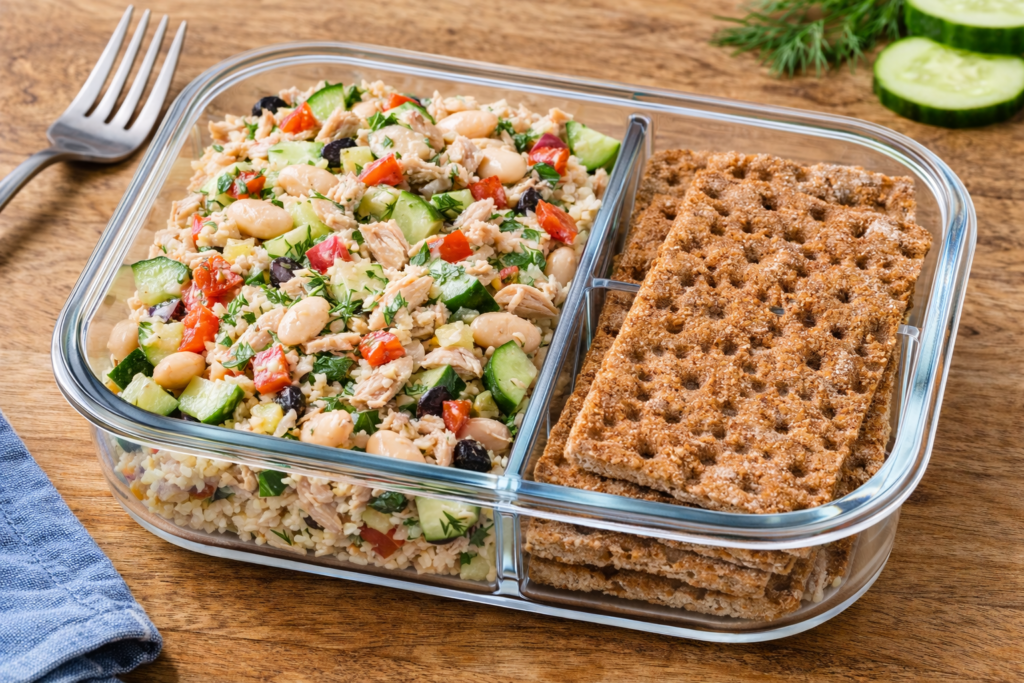
This is a strong option for days when you want lunch sorted without turning on the hob. The beans make it more filling, and the crisp vegetables stop it from feeling flat.
Recipe at a glance
- Prep time: 15 minutes
- Cook time: 0 minutes
- Total time: 15 minutes
- Servings: 2
- Estimated kcal per serving: 367 kcal
Ingredients
| Ingredient | Metric quantity | Imperial quantity | Estimated kcal for listed amount | Notes / swaps |
|---|---|---|---|---|
| Tuna in spring water, drained | 240 g | 8.5 oz | 278 | Use canned salmon if preferred |
| Cannellini beans, drained | 160 g | 5.6 oz | 176 | Butter beans also work |
| Cucumber, diced | 180 g | 6.3 oz | 27 | Adds crunch and volume |
| Celery, sliced | 80 g | 2.8 oz | 13 | Optional but useful for texture |
| Red onion, finely chopped | 40 g | 1.4 oz | 16 | Shallot is a milder swap |
| Red bell pepper, diced | 100 g | 3.5 oz | 31 | Yellow pepper also works |
| Light mayonnaise | 30 g | 2 tbsp | 70 | Use all yogurt if preferred |
| Greek yogurt | 60 g | 1/4 cup | 36 | Helps keep the dressing lighter |
| Lemon juice | 15 mL | 1 tbsp | 4 | Brightens the whole mix |
| Capers | 15 g | 0.5 oz | 4 | Optional but flavorful |
| Fresh dill, chopped | 5 g | 0.2 oz | 2 | Parsley also works |
| Rye crispbreads | 20 g | 0.7 oz | 76 | Pack separately to keep crisp |
Total estimated kcal for the whole recipe: 733 kcal
Estimated kcal per serving: 367 kcal
Equipment needed
- Mixing bowl
- Spoon
- Knife and chopping board
- Two lunch containers
How to make it
- Rinse and drain the beans well, then pat them dry lightly with kitchen paper if they look wet.
- Dice the cucumber and bell pepper, slice the celery, and chop the red onion and dill.
- Mix the mayonnaise, Greek yogurt, lemon juice, and capers in a bowl until smooth.
- Add the tuna and break it up gently with a fork.
- Fold in the beans and chopped vegetables until everything is evenly coated.
- Rest the mixture for 10 minutes in the fridge if you have time. This helps the flavors settle.
- Divide into two lunchboxes and pack the rye crispbreads separately so they stay crunchy.
Tips for best results
- Drain the tuna and beans very well so the lunch does not turn watery.
- Chop the vegetables quite small so every forkful has crunch.
- Use a mix of mayo and yogurt for a creamier texture without making it too heavy.
- Keep the crispbreads separate until lunch.
- Add the dill at the end so it stays fresh-tasting.
Easy swaps and variations
- Swap the beans for chickpeas.
- Use chopped pickles instead of capers.
- Add a handful of baby spinach under the tuna mix for more volume.
- Serve it in lettuce cups instead of with crispbreads.
Storage and meal-prep notes
Store in the fridge for up to 2 days. This recipe is best eaten cold and is not suitable for freezing. Stir once before eating if the dressing settles slightly.
What to serve with it
This pairs well with extra cucumber sticks, sliced radishes, or a small apple if you want a fuller lunch.
Nutrition estimate
- Total kcal: 733 kcal
- Kcal per serving: 367 kcal
- Rough protein: 31 g per serving
- Rough carbs: 20 g per serving
- Rough fat: 10 g per serving
These nutrition values are practical estimates and will vary depending on brand, exact ingredients, and portion size.
Recipe 4: Greek Chickpea Feta Pasta Lunchbox
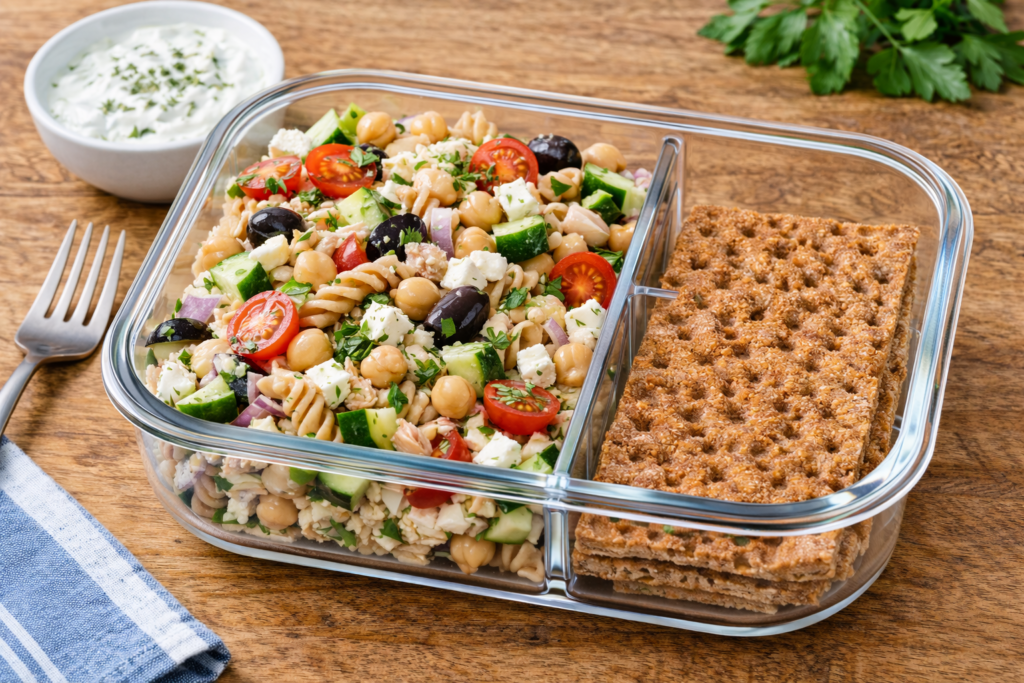
If you like a cold lunch that still feels substantial, this is a reliable one. It is simple, bright, and easy to eat straight from the fridge.
Recipe at a glance
- Prep time: 10 minutes
- Cook time: 10 minutes
- Total time: 20 minutes
- Servings: 2
- Estimated kcal per serving: 367 kcal
Ingredients
| Ingredient | Metric quantity | Imperial quantity | Estimated kcal for listed amount | Notes / swaps |
|---|---|---|---|---|
| Dry wholewheat pasta | 80 g | 2.8 oz | 278 | Fusilli or penne both work |
| Chickpeas, drained | 120 g | 4.2 oz | 197 | White beans can be used instead |
| Cucumber, chopped | 150 g | 5.3 oz | 23 | Persian cucumber also works |
| Cherry tomatoes, halved | 150 g | 5.3 oz | 27 | Use ripe tomatoes for best flavor |
| Red onion, thinly sliced | 40 g | 1.4 oz | 16 | Soak briefly if you want a milder taste |
| Olives | 20 g | 0.7 oz | 23 | Kalamata or black olives both work |
| Feta | 30 g | 1.1 oz | 80 | Reduced-fat feta is fine |
| Olive oil | 10 mL | 2 tsp | 80 | Part of the dressing |
| Red wine vinegar | 15 mL | 1 tbsp | 3 | Lemon juice also works |
| Dried oregano | 1 tsp | 1 tsp | 3 | Classic Greek-style flavor |
| Fresh parsley, chopped | 10 g | 0.35 oz | 4 | Optional but freshens it up |
Total estimated kcal for the whole recipe: 734 kcal
Estimated kcal per serving: 367 kcal
Equipment needed
- Saucepan
- Colander
- Large mixing bowl
- Knife and chopping board
- Two lunch containers
How to make it
- Bring a pan of water to the boil. Cook the pasta for 8 to 10 minutes until tender but still holding its shape.
- Drain the pasta and rinse briefly under cold water to cool it quickly. Shake off as much water as possible.
- Whisk together the olive oil, red wine vinegar, and oregano in a large bowl.
- Add the cooled pasta, chickpeas, cucumber, tomatoes, red onion, olives, and parsley.
- Toss well so the dressing coats everything evenly.
- Crumble the feta over the top and fold gently once more.
- Divide between two lunchboxes and chill until needed.
Tips for best results
- Cool the pasta before mixing so the vegetables stay crisp.
- Shake the pasta dry well after rinsing so the dressing does not turn watery.
- Slice the onion thinly so it blends into the salad instead of dominating it.
- Add the feta last to keep some larger pieces intact.
- Taste after chilling and add a little extra vinegar if you want more sharpness.
Easy swaps and variations
- Add chopped roasted peppers instead of olives.
- Use cooked quinoa in place of the pasta for a different base.
- Swap feta for light mozzarella pearls.
- Add chopped spinach for extra bulk with very few added calories.
Storage and meal-prep notes
Store in the fridge for up to 3 days. Stir once before eating if the dressing settles at the bottom. This recipe is not ideal for freezing because the vegetables lose texture.
What to serve with it
It works well on its own, but extra cucumber slices or a small pot of tzatziki make a good side.
Nutrition estimate
- Total kcal: 734 kcal
- Kcal per serving: 367 kcal
- Rough protein: 15 g per serving
- Rough carbs: 42 g per serving
- Rough fat: 11 g per serving
These nutrition values are practical estimates and will vary depending on brand, exact ingredients, and portion size.
Recipe 5: Spinach Egg Muffin Protein Lunchbox

This box is useful when you want something you can grab without thinking. The egg muffins make the protein feel easy, and the potatoes, tomatoes, and hummus give it more of a complete lunch feel.
Recipe at a glance
- Prep time: 15 minutes
- Cook time: 25 minutes
- Total time: 40 minutes
- Servings: 2
- Estimated kcal per serving: 387 kcal
Ingredients
| Ingredient | Metric quantity | Imperial quantity | Estimated kcal for listed amount | Notes / swaps |
|---|---|---|---|---|
| Eggs | 4 large | 4 large | 280 | Use medium eggs if preferred |
| Cottage cheese | 120 g | 4.2 oz | 98 | Helps keep the muffins soft |
| Spinach, chopped | 60 g | 2.1 oz | 14 | Kale can work if finely chopped |
| Red bell pepper, diced | 80 g | 2.8 oz | 25 | Any sweet pepper works |
| Spring onion, sliced | 30 g | 1 oz | 10 | Chives also work |
| Baby potatoes | 200 g | 7 oz | 154 | Halve larger potatoes |
| Olive oil | 10 mL | 2 tsp | 80 | For potatoes and muffin tin |
| Cherry tomatoes | 150 g | 5.3 oz | 27 | Add fresh crunch |
| Hummus | 30 g | 2 tbsp | 80 | Pack separately if possible |
| Smoked paprika | 1 tsp | 1 tsp | 6 | Optional but good |
Total estimated kcal for the whole recipe: 774 kcal
Estimated kcal per serving: 387 kcal
Equipment needed
- Muffin tin
- Mixing bowl
- Baking tray
- Whisk or fork
- Knife and chopping board
- Two lunch containers
How to make it
- Preheat the oven to 200°C / 400°F. Line a baking tray with parchment if you have it.
- Halve the baby potatoes and toss them with 1 tsp of the olive oil. Spread them on the tray and roast for 22 to 25 minutes, turning once halfway, until golden on the cut sides and tender in the middle.
- Brush or rub the muffin tin with the remaining 1 tsp olive oil.
- Whisk the eggs, cottage cheese, spinach, red pepper, spring onion, and smoked paprika in a bowl until evenly mixed.
- Pour the mixture into 6 muffin cups, filling each about three-quarters full.
- Bake for 14 to 16 minutes until the tops look set, the centres are just firm, and the muffins are lightly puffed.
- Cool for 5 minutes, then lift the muffins out carefully.
- Pack 3 egg muffins into each lunchbox with half the roasted potatoes, half the cherry tomatoes, and 1 tbsp hummus.
Tips for best results
- Chop the vegetables small so the muffins hold together better.
- Do not overbake the egg muffins or they can turn rubbery after chilling.
- Let the potatoes cool before packing so condensation does not soften the tomatoes.
- A non-stick muffin tin makes removal much easier.
- The muffins taste best when reheated briefly, not for too long.
Easy swaps and variations
- Use cooked sweet potato cubes instead of baby potatoes.
- Swap hummus for a spoonful of cottage cheese or light cream cheese.
- Add chopped cooked turkey or ham to the muffins if you want even more protein.
- Use broccoli florets very finely chopped in place of spinach.
Storage and meal-prep notes
Store in the fridge for up to 3 days. The egg muffins and roasted potatoes can be frozen separately for up to 1 month. Reheat the muffins and potatoes until hot, then add the tomatoes and hummus after reheating.
What to serve with it
This box is already quite complete, but cucumber sticks or sugar snap peas fit well if you want more crunch.
Nutrition estimate
- Total kcal: 774 kcal
- Kcal per serving: 387 kcal
- Rough protein: 21 g per serving
- Rough carbs: 25 g per serving
- Rough fat: 18 g per serving
These nutrition values are practical estimates and will vary depending on brand, exact ingredients, and portion size.
Recipe 6: Sesame Tofu Edamame Noodle Jar
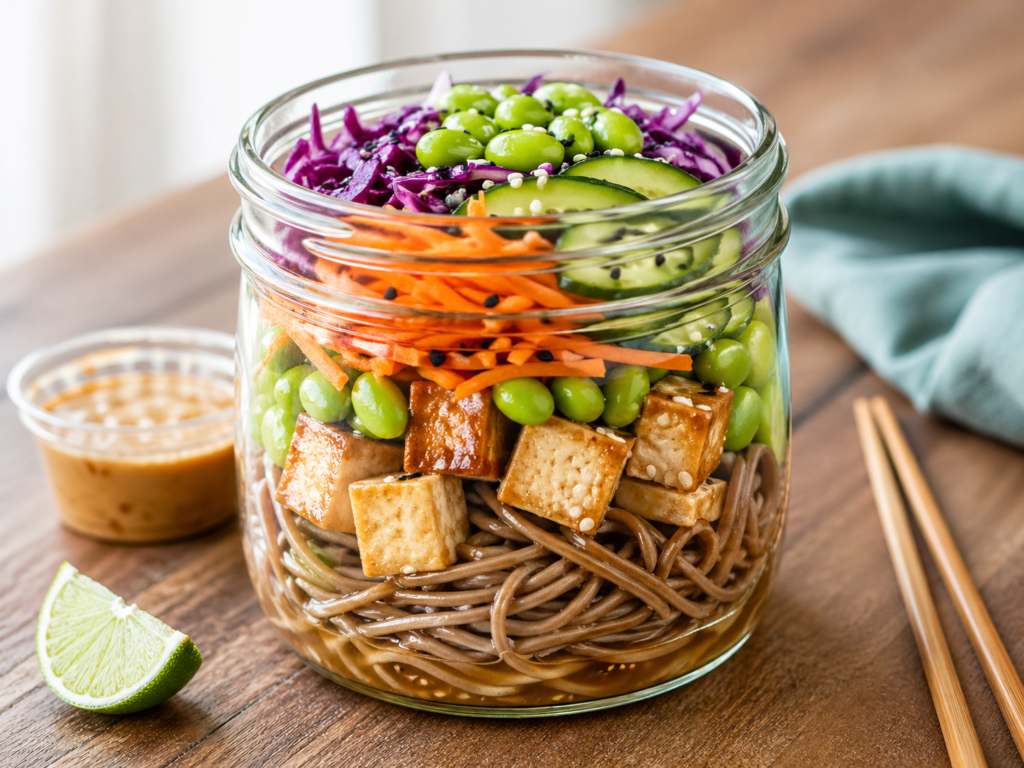
This lunch feels fresh, layered, and a little more interesting than a standard salad box. It is a good plant-based option when you want texture, protein, and something that still tastes good cold.
Recipe at a glance
- Prep time: 15 minutes
- Cook time: 15 minutes
- Total time: 30 minutes
- Servings: 2
- Estimated kcal per serving: 385 kcal
Ingredients
| Ingredient | Metric quantity | Imperial quantity | Estimated kcal for listed amount | Notes / swaps |
|---|---|---|---|---|
| Firm tofu | 250 g | 8.8 oz | 190 | Press briefly for best texture |
| Dry soba noodles | 70 g | 2.5 oz | 238 | Wholewheat spaghetti can work |
| Shelled edamame | 80 g | 2.8 oz | 98 | Use frozen and thaw or boil |
| Carrot, shredded | 100 g | 3.5 oz | 41 | Matchsticks also work |
| Cucumber, sliced | 120 g | 4.2 oz | 18 | Adds freshness |
| Red cabbage, shredded | 100 g | 3.5 oz | 31 | Great for crunch |
| Sesame oil | 5 mL | 1 tsp | 40 | Strong flavor, so a little goes far |
| Low-sodium soy sauce | 30 mL | 2 tbsp | 10 | Tamari works if needed |
| Rice vinegar | 15 mL | 1 tbsp | 3 | Adds acidity |
| Peanut butter | 10 g | 2 tsp | 59 | Smooth works best |
| Lime juice | 15 mL | 1 tbsp | 4 | Fresh is ideal |
| Sesame seeds | 5 g | 1 tsp | 29 | Sprinkle at the end |
| Garlic, grated | 1 clove | 1 clove | 4 | Adds depth |
| Fresh ginger, grated | 5 g | 1 tsp | 4 | Optional but worth it |
Total estimated kcal for the whole recipe: 769 kcal
Estimated kcal per serving: 385 kcal
Equipment needed
- Saucepan
- Small frying pan or non-stick skillet
- Jar or small bowl for dressing
- Knife and chopping board
- Two jars or lunch containers
How to make it
- Pat the tofu dry and cut it into small cubes.
- Heat a non-stick pan over medium heat. Add the tofu and cook for 6 to 8 minutes, turning a few times, until the edges look lightly golden.
- Bring a pan of water to the boil. Cook the soba noodles for 4 to 5 minutes until just tender. Drain and rinse under cold water to stop the cooking.
- Cook the edamame for 3 minutes in simmering water if it is frozen, then drain.
- Whisk the sesame oil, soy sauce, rice vinegar, peanut butter, lime juice, garlic, and ginger in a jar or bowl. If it looks too thick, stir in 1 to 2 tsp water until pourable.
- Divide the dressing between two jars or containers.
- Layer in the noodles, tofu, edamame, red cabbage, carrot, and cucumber. Finish with sesame seeds on top.
- Shake before eating if using jars, or toss in the container just before serving.
Tips for best results
- Rinse the noodles well after cooking so they do not clump together.
- Let the tofu brown a little for better texture and flavor.
- Put the dressing at the bottom if you are using jars so the vegetables stay fresher.
- Slice the vegetables thinly so the jar stays easy to eat from.
- Add the sesame seeds just before serving if you want them crunchier.
Easy swaps and variations
- Use shredded chicken instead of tofu if you want a non-vegetarian version.
- Swap peanut butter for tahini if needed.
- Use pre-shredded slaw mix to save time.
- Add a few chopped spring onions for extra bite.
Storage and meal-prep notes
Store in the fridge for up to 3 days. This is best eaten cold or at cool room temperature. It does not freeze well because the vegetables soften too much after thawing.
What to serve with it
A lime wedge or a few extra cucumber ribbons are enough. This jar already has plenty of texture and flavor.
Nutrition estimate
- Total kcal: 769 kcal
- Kcal per serving: 385 kcal
- Rough protein: 21 g per serving
- Rough carbs: 33 g per serving
- Rough fat: 15 g per serving
These nutrition values are practical estimates and will vary depending on brand, exact ingredients, and portion size.
Recipe 7: Pesto Chicken Orzo Tomato Lunchbox
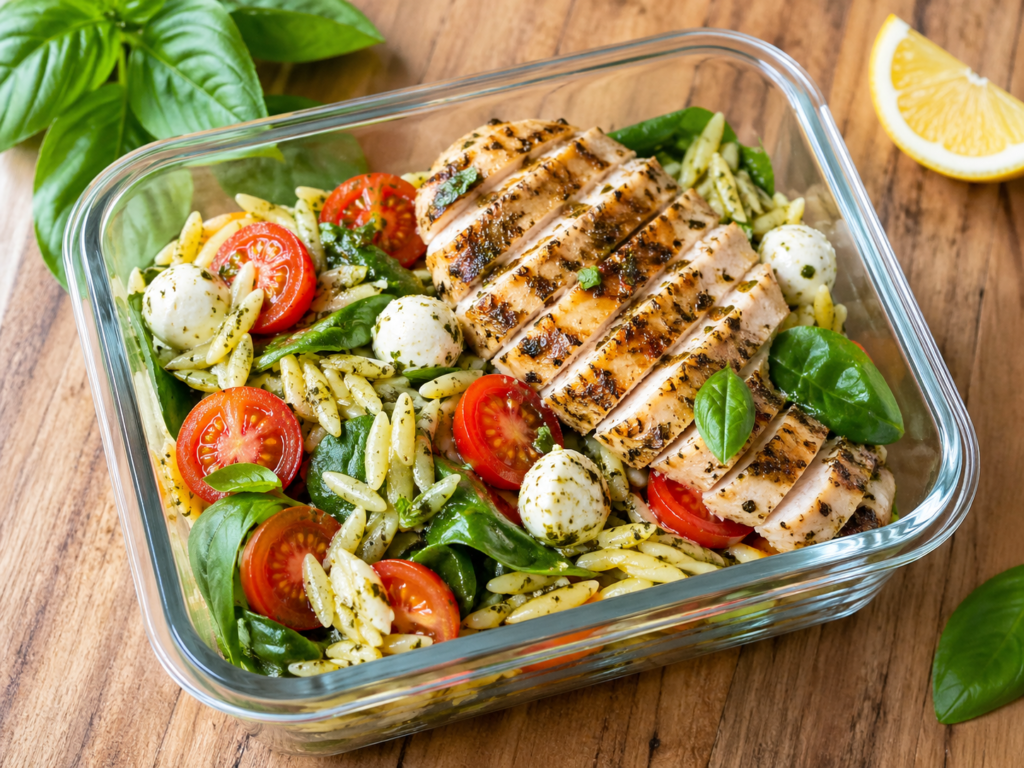
This is a good bridge between pasta salad and a more structured meal-prep lunch. The pesto gives strong flavor with a small amount, and the orzo makes it feel easy to pack and eat.
Recipe at a glance
- Prep time: 10 minutes
- Cook time: 15 minutes
- Total time: 25 minutes
- Servings: 2
- Estimated kcal per serving: 390 kcal
Ingredients
| Ingredient | Metric quantity | Imperial quantity | Estimated kcal for listed amount | Notes / swaps |
|---|---|---|---|---|
| Chicken breast, skinless | 220 g | 7.8 oz | 242 | Turkey breast also works |
| Dry orzo | 80 g | 2.8 oz | 292 | Small pasta shapes are fine |
| Cherry tomatoes, halved | 180 g | 6.3 oz | 32 | Use ripe, sweet tomatoes |
| Baby spinach | 40 g | 1.4 oz | 9 | Rocket also works |
| Light pesto | 25 g | 1.8 tbsp | 80 | Regular pesto is stronger and richer |
| Light mozzarella | 40 g | 1.4 oz | 80 | Feta also works |
| Olive oil | 5 mL | 1 tsp | 40 | For cooking the chicken |
| Lemon juice | 15 mL | 1 tbsp | 4 | Freshens the pesto |
| Fresh basil | 5 g | 0.2 oz | 1 | Optional but nice |
Total estimated kcal for the whole recipe: 780 kcal
Estimated kcal per serving: 390 kcal
Equipment needed
- Saucepan
- Frying pan
- Knife and chopping board
- Mixing bowl
- Two lunch containers
How to make it
- Bring a pan of water to the boil and cook the orzo for 8 to 9 minutes until tender. Drain well.
- Heat the olive oil in a frying pan over medium heat.
- Add the chicken breast and cook for 5 to 6 minutes on the first side until lightly golden.
- Flip the chicken, reduce the heat to medium-low, and cover for 4 to 5 minutes until the thickest part reaches 74°C / 165°F. The juices should run clear.
- Rest the chicken for 5 minutes, then slice into strips.
- Toss the warm orzo with the pesto and lemon juice in a bowl.
- Fold in the cherry tomatoes and spinach. The spinach should soften slightly from the heat.
- Divide the orzo mixture between two lunchboxes. Top with sliced chicken, mozzarella, and basil.
Tips for best results
- Rest the chicken before slicing so it stays juicy.
- Toss the orzo while warm so the pesto coats it evenly.
- Do not add too much pesto or the lunch can feel heavier than intended.
- Use small mozzarella pieces so they distribute better through the box.
- Let everything cool before sealing the container.
Easy swaps and variations
- Use cooked quinoa instead of orzo.
- Swap mozzarella for feta or cottage cheese.
- Add roasted courgette or roasted peppers for more vegetables.
- Use leftover cooked chicken to make this even faster.
Storage and meal-prep notes
Store in the fridge for up to 3 days. This lunch can be eaten cold or reheated briefly. It is not the best choice for freezing because the tomatoes and spinach soften too much after thawing.
What to serve with it
A few cucumber slices, extra cherry tomatoes, or a small side salad work well without taking the calories too high.
Nutrition estimate
- Total kcal: 780 kcal
- Kcal per serving: 390 kcal
- Rough protein: 31 g per serving
- Rough carbs: 30 g per serving
- Rough fat: 14 g per serving
These nutrition values are practical estimates and will vary depending on brand, exact ingredients, and portion size.
Final practical takeaway
If you want the easiest starting point, go for the tuna box or the Greek pasta lunchbox. If you want something warmer and more filling, the turkey taco rice box or pesto chicken orzo are strong options. And if you like grab-and-go meals that can be eaten in stages, the egg muffin lunchbox is especially useful.
FAQ
Can lunchboxes under 400 calories still be filling?
Yes. The most satisfying boxes combine protein, fiber-rich carbs, and high-volume vegetables. Several recipes here also use beans, chicken, eggs, tofu, or tuna to help the lunch feel more substantial.
How far ahead can I make these lunchboxes?
Most of them keep well in the fridge for 3 days. The tuna box is best within 2 days, and crisp items like lettuce, crackers, or cucumber stay freshest when packed separately.
Which of these recipes can I freeze?
The egg muffins, cooked taco turkey mixture, roasted chicken, and cooked grains freeze well. Salad-style boxes with raw cucumber, tomatoes, or dressed greens are better kept in the fridge.
How can I raise or lower the calories?
To raise calories, add avocado, extra grains, cheese, or a dip. To lower them, reduce oil, cheese, pesto, noodles, pasta, or crackers first while keeping the protein portion steady.
What containers work best for meal-prep lunchboxes?
Medium leakproof containers with two or three compartments are easiest for most of these recipes. Small sauce pots also help keep dressings, hummus, and crunchy toppings separate until lunch.
Are the calorie numbers exact?
No. They are practical estimates based on common ingredient data and average supermarket products. Your final numbers will vary slightly depending on brand, exact weight, and portion size.